Showing posts with label Research. Show all posts

Thursday, August 3, 2023

Research Project: Painting Over 3D

    For this project, I decided to create a painter for my scene of my CocaCola Machine. Most of everything I've ever made has been displayed in Unreal Engine for the final product, but I rarely do any type of post-processing on my renders. 

I was inspired by the art of Makoto Shinkai, an animator, filmmaker, and manga artist. I love his work - so beautiful! The illustrations and films are just at another level, and I would like to experiment with trying to bring my own work into that style.

This post will mostly be a step-by-step on how I attempted to integrate that style into my CocaCola Machine:


Firstly, in hindsight, this is actually a difficult scene to convert to Shinkai's style. My scene is very grungy, dank, and dark, while his works stay closer to picturesque and clean. No matter, this is all about experimenting right? Maybe in the future I can create a better scene to try this. 

First, I took this render into photoshop as an EXR image. I like to render using the Movie Render Queue (I have a post on that) because there are more options for anti-aliasing and console variables.

In photoshop I brightened the image's exposure, just to brighten the dark areas. For this, I was okay with loosing some of the grunge and darkness for the sake of the style.

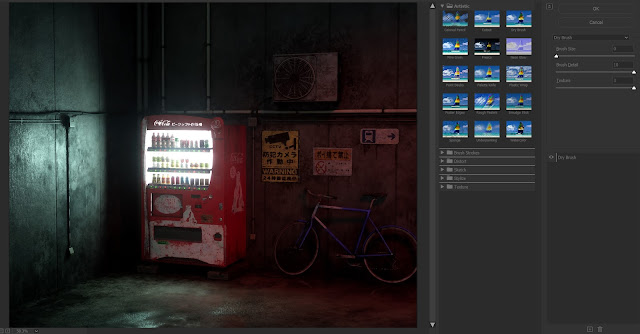
I then converted the image from an EXR (32 bit) to an 8bit image so that I could peruse the filter gallery. Initially, in the tutorials I found, they edited the color values and luminance to achieve a paniterly look. The grunge in my scene could not be smoothed out like that though, I would have to smooth it out manually or use a strong filter. After duplicating the image layer and hiding the original layer, I explored the FIlter Gallery.


I used the Dry Brush filter (at above settings) but the image didn't completely smooth out. I did like the results, so I went through with the smudge tool and smoothed out areas like the signs, the ground, and the sides of the vending machine.


After locking that layer, I created a new one for 'patch smudging.' This is where I chose a section on the wall and with the color picker, I brushed on patched of color to smudge out. Iused Kyle's Paintbox - Wet Blender 50.


Since I was smudging the color around, it is not 100% opaqe, so some detail from the image is coming through. I went over the walls and ground like this, and created a separate layer for the bike shadows, because I wanted to keep the shape of that shadow withough loosing it into the wall.

Patched Walls and Ground


After, since I now knew what brushed out looked like on a larger scale, I went into the smaller pieces - piped, bicycle, signs again - on the bottom filtered layer (not the OG layer, the one above it.)

The signature look for anime and manga is the black outlines, of course. In my references (Not all Shinkai's work) there are thin black line work around foreground elements (if not all elements) and almost no line work in the background plate.


I elected to outline all of the elements, because I don't think I'm al the level to be able to have a whole background plate that has elements that wont blend into each other. It was also a great guide more me to tell where everything is since my image is so dark.

Linework

The linework is a bit messy and too much, but this was my first time working like this, so I didn't feel too bad about it. I should have used a smaller soft round brush to outline, rather than a harder edged brush. 

In my final render, I did a mix of blur and sharpen to smooth out the linework, and I turned down the opacity to 40%, which helped the whole image.

Next I added soft highlights. This step helped give the image more life and shape. It really popped some elements that faded into the background in the original render.

Soft Highlights


While in some of my research and references the soft highlights are more consistent, I still wanted to keep the feel of grunge. Smooth highlights would have conveyed a clean smooth surface, which describes nothing in my scene. Just a Solid Color layer (white) with overlay enabled allowed for these highlights. 

Lastly, I put in harder edge highlights. In the reference of the dining table, there are softer highlights on everything and harder, smaller spots of highlights are on the objects directly in the light. With another white Solid Color layer with overlay, I put in smaller spots of edge highlights on objects that could convey those types of reflections.

Harder Edge Highlighs

I feel like this step, if done correctly, really helps put the image from painterly to painterly anime. It's not quite there, I might need to work on it more and get more practice. 

Above is my final image (for now). I had a lot of fun doing this project because I rarely use post processing or photoshop on my renders after they come out of Unreal Engine. I think I might try this technique on some of my other projects, or maybe create projects with this technique and SKinkai's art style in mind. 

Some links to tutorials I looked at for this project - I used then kinda, but they were good starting points: 


By the way, I was whining to Kayleigh Sims about my woes with working with photoshop post-process (Me - a proclaimed 'can't draw' 3D artist and Kei - illustrator extraordinaire) and she just patted me on the shoulder and said it was a Skill Issue. ಠ_ಠ Like. I know, but she didn't have to say it like that!


Wednesday, April 26, 2023

Look Dev Rig UPDATE!

 Small Update!

Link: https://hmarti0.gumroad.com/l/rtizk

CODE: FIEA19

1) Master Level - The master level has now been moved to a 'Levels' folder so that when the level is duplicated, the new levels are contained in the folder rather than in the top Lighting folder.

2) Rig Addition - the rig now includes a Skylight that is disabled. This is for those special (translucent) materials that need a skylight to appear. All you need to do is check on 'Affects World' in the details panel on the Skylight and either delete the HDRI Backdrop or check on 'Actor Hidden In Game.' 


You use the HDRIs in the same way as in the HDRI Backdrop by replacing them in the 'Cubemap.' you can also change the rotation of the HDRI in the 'Source Cubemap Angle.'


*NOTE: The InfinityWall might cast some shadows with the Skylight turned on. 

3) Smoother InfinityWall Mesh.


Just a note: Lumen is disabled, so if you are looking to have cool emissive lighting on your models, make sure to turn Lumen on in the post process. The InfinityWall affects Lumen's Global Illumination (regardless of the 'Cast Shadows' setting), so you may need to hide the InfinityWall, or turn off the HDRI Backdrop and turn on the Skylight. 

Also, if you are trying to show off reflections, the Skylight will reflect clearer than the HDRI Backdrop. There are a ton of HDRIs to reflect, so experiment with them!

To conclude, smoother InfinityWall, a new 'Level's folder, and a skylight. When should I use the skylight? With translucent materials, when nice reflections are required, and if you want emissive and the InfinityWall at the same time. There are likely other scenarios, so be on the lookout.

This tool is supposed to be a basic foundation for your lighting. At the least, you can drop in a model easily for lighting. That's why I have Lumen disabled and have an HDRI Backdrop. Lumen can be a bit prickly right now, so the easiest way would be to have the basic GI and Reflections method with raytracing turned on for the lights (soft shadows!) The HDRI Backdrop also allows the user to see what is happening in the reflections and fill light. Anything else is up to you to experiment and change as you see fit! So! Go on and show off those cool assets!


(Also, let me know if you have any requests, changes, or feedback!)

Thursday, March 16, 2023

Using the Look Dev Rig

Intro

CODE: FIEA19

This Look Dev tool was designed as a tool for artists to be able to easily present their assets in a neutral scene. It should work for most assets, but the lights and HDRI can be changed to fit the asset. Also, I wanted to create an easy way to use the 1-1 method for material creation in Substance Painter to Unreal Engine. 

Assets will often look much different in Painter than in Unreal Engine. By using this tool's HDRI options and by following the instructions in my earlier Color Management post, you should be able to have your asset in both programs with very similar lighting environments. If you choose an HDRI with similar light, color, and brightness to your game scene, the rig can work as an in-between while you develop the materials before they go into the scene.

Loading up the Project


The Look Dev Lighting Rig is an Unreal Engine 5.1 Project. After unzipping, there should be Config and Content folders and the uProject file in the folder.

Once you load up the project, you should be in the LightingRigMaster level. I recommend duplicating this level and working in the duplicate level. Keeping the Master level untouched means you can re-duplicate the master for future projects.

First, before you do any work, please check your Plugins for: 'HDRI Backdrop' and 'Movie Render Queue.' The movie render queue isn't required, but I also have some rendering configurations if you want to render some stills or sequences.

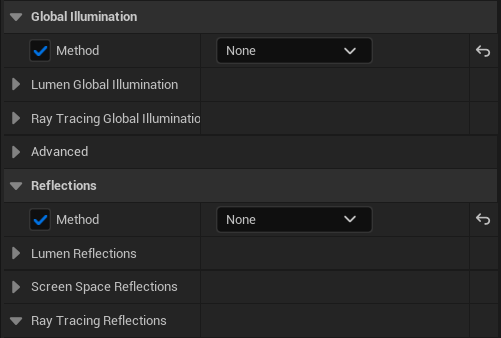
Next, double-check that Support Hardware Raytracing is enabled in the Project Settings. Also that your settings (in the Rendering section) match the image below:


These settings should already be there, but just to prevent any issues, double check.


Contents of the Project


Under Content, there is one folder: Lighting. In the Lighting folder, there are four folders:
  •     FBX - contains the background meshes
  •     HDRI - includes 32 HDR files (from Substance Painter)
  •     LookDev - contains blueprints and materials for the color checkers and LookDev spheres
  •     Rendering - the turntable sequence and various presets for the movie render queue


All of the meshes and blueprints are already in the rig level, so there's no need to pull anything in. The only thing you are placing in the rig is your own assets and materials. (I'd recommend making Mesh and Material folders outside the Lighting folder.) If you know you'll be using the rig for many of your assets, you should also make a level folder and place the individual asset rig levels in that folder.


The Lighting Rig Level


In the Outliner, there are five folders:
  • BackgroundMeshes - This folder holds the different options for the background meshes.
  • StaticMeshes - these are placeholder cubes for the cameras to focus on.
  • Cameras - three cinecameras at different distances from the origin. They all have a focal length of 35 and an aperture of 2.8. Their manual focus distances are eyedropped from their respective cube placeholder.
  • LookHelpers 
    • blueprints for the look dev spheres (chrome, black, white, and mid-grey). These spheres are gauges for how dark or light your scene is. The white should never be blown out, and the black should always be visible. 
    • There is a blueprint for a color checker, also. The bottom color chart displays how color should react to your scene lighting. The top color chart has an emissive value that negates the environment's lighting. These are 'close' to the actual values of the color. Ideally, these charts should be at similar values in your renders, but it's not very important in games. The chart is seen more in animation, so feel free to hide it. 
  • Lighting 
    • the three rect lights for the three-point lighting system. I did not identify any as the key, rim, or anything else because you should tweak these lights when working with your assets, so they're just 1, 2, and 3. (Raytracing is enabled for those soft shadows.)
    • Also, the HDRI Backdrop is in this folder. The HDRIs can be switched out here; remember, you have 32 options. The default intensity is 1, but this might need to be adjusted because of the range of different HDRIs. Some are indoor, some are outdoor, and some are studio environments. Some will be very bright, so turn down that intensity.
    • The Post process volume - auto exposure is disabled, and Lumen is also disabled. The SM_InfinityWall is set to 'No Cast Shadows,' but due to Lumen's Global Illumination, the wall will block the HDRI's lighting no matter what. You can enable Lumen for your renders if you use the SM_BaseCylinder or the SM_Ramp mesh.


Using the Light Rig


Everything is visible. All of the background meshes, helpers, and placeholders are visible in the scene. Hiding the helpers and placeholders should be the first step. 

Once you get your asset in, the placeholder cubes should help you with scale and which camera to use. The smallest cube is matched to CineCameaTight, and the largest is matched to CineCameraWide. You can, of course, move the cameras and take shots from multiple angles. The cameras are locked, so you just need to unlock them by right-clicking the camera in the Outliner and going to Transform>Lock Actor Movement.


After you set up your cameras and tweak the lights and HDRI, you can also render a turntable sequence. 

The Rendering folder has a sequence with the three cameras and one of the placeholder cubes. If you duplicated the level, the actor names with be shown in red. 


All you need to do is reassign the cameras by right-clicking the actor in the Sequencer and going to Assign Actor>"Camera Name."


You can replace the "MeterCube" actor with your asset via the same method. This will assign the MeterCube's rotation sequence to your asset, so it will spin 360 degrees during the turntable sequence. Lastly, you need to assign the camera to the Camera Cuts track.


Now, there are two options to render out your turntable. If you don't have the Movie Render Queue or don't care for it, there is the Movie Scene Capture (Legacy) option.


All you have to do is select your Output Format, Resolution, and Output Directory. once you click 'Capture Movie,' your turntable renders into a video or image sequence. Take the sequence into Premier or Davinci Resolve to make a video out of it.


Rendering with the Movie Render Queue


If you did install the Movie Render Queue, you have a few more options. 


Upon selecting or opening the Movie Render Queue, a window will pop up with your sequence listed as a 'Job.' You can change the job name in the panel on the right and the Sequence and Map that the job interacts with (you shouldn't have to mess with this.) 

Here, the only thing you should need to change is the config under the 'Settings' section. 


There are seven presents already made in the project for you to use. These configs tell the renderer the info needed to render frames. Things like output format, directory, overrides, anti-aliasing and variables are set in the config. 

Present Descriptions (all configs render to the Saved/MovieRenders folder):
  • BasicConfig - this config will only render a png image sequence
  • OverridesConfig 
    • png image sequence
    • Overrides for meshes and materials (a bit overkill, but this will ensure that the LOD0 for the asset mesh is used and the textures are fully rendered). Generally, this is already enabled, but if there are issues rendering your mesh, maybe try this config.
  • AAConfig
    • png image sequence
    • Anti-aliasing with a temporal sampling count of 64. Also, the engine 'warms up' for 120 frames before rendering the sequence.  If there is a particle system, this may be helpful. ('Render Warm Up Frames' might need to be enabled for certain particle systems.)
    • Longer rendering time due to sampling and warm-up frames

  • BasicVariableConfig
    • png image sequence
    • Console Variables included to improve Motion Blur, Depth of Field, Bloom, and Tonemapper quality
    • longer rendering
    • RTXVariableConfig
      • png image sequence
      • Includes console variables from BasicVariableConfig
      • Includes Console Variables to improve Raytracing Global Illumination, Reflections, and Shadows
      • even longer rendering (longer than BasicVariablesConfig)
    • FullConfig
      • png image sequence
      • Has Anti-aliasing settings from AAConfig
      • Includes Overrides from OverridesConfig
      • Includes Variables from RTXVariableConfig
      • Longer render time
    • FullEXRConfig
      • has AA, Overrides, and Variables from FullCOnfig
      • EXR image sequence for editing in a video program
      • longest rendering time

    Once you choose a config preset, you can render the sequence by clicking 'Render(Local) in the Movie render Queue. Another window will pop up with a Render Preview of the camera cuts and some stats on the rendering. Once the render is done, you can bring the image sequence into a video editing program, and bam! Done! 

    Wednesday, February 8, 2023

    Color Management Research

    Info about Color Management

    This is a master post for all the things concerning Color Management that I have found and learned. I'll put the intro material first, then the stuff relating to Painter and Unreal Engine, and put all the miscellaneous info at the bottom.


    FIRST! What is Color Management? Color Spaces?

    Basically, a 'color space' is what dictates what color the RBG values will be. The input RGB values are 'translated' by the Color Space to the output RGB values. They are necessary because there are many different types of screens (standard HD, Apple screens, IMAX, etc.) and they all display colors uniquely. Then there's also the factor of non-linear vs. linear color, and that can get complicated too.

    What Are Color Spaces video - this is a baby video that is a quick overview of Color Spaces. There is a deeper 'Part 2' that explains color management more broadly (it assumes you have no prior knowledge and want to know the more technical details.) here: Longer Color Management Video and another video detailing color spaces specifically Color Spaces Explained - all from Video Tech Explained. 


    Color Management for Substance Painter and Unreal Engine 5

    Color Spaces impact artists because when we create materials, we are usually creating them in Substance Painter. We are defining the values of our materials based on the color space that Substance is using. Once we export and take them over to Unreal, we are looking at those materials in the color space Unreal Engine is using. 

    by default, Substance is not using the same color space as UE. Substance is using a linear color space, while UE5 is using the ACES sRGB color space. This causes a very annoying disconnect that has to be fixed by either going back and tweaking the material in Painter or adding adjustment nodes in Unreal.

    To solve this, we just need to make Substance look like Unreal. In older versions of Painter, you had to find and download the ACES Lut and install it and adjust a bunch of settings - all things that are explained in this ACES for Painter video from William Faucher. I would recommend watching this video anyway, just because he explains why we do this. Also, fair warning, there is no way to get a perfect 1:1 for Painter and Unreal. We can get super close, but in the end, both programs are using different rendering software, so there are some differences. Faucher demonstrates the differences in the video.

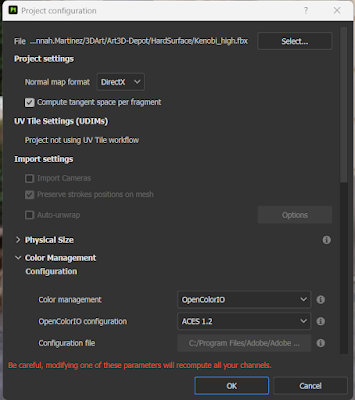
    In the newer versions of Painter, it is quite easy to change the color spaces. There is no downloading or installation of anything required. All you need to do is go to Edit>Project Configuration and scroll to the Color Management dropdown.


    Color Management should be set to OpenColorIO and OpenColorIO configuration should be set to ACES 1.2

    And there! In your viewport, there should be two dropdown taps in the upper right corner. The left dropdown selects your color space. For a material going to UE5, this dropdown should say ACES - sRGB.


    This should be enough for your materials to be accurate when taking them to Unreal Engine. 


    Look Development Light Rigs with HDRI Backdrops


    There is a  further step that you can take to be sure that your materials will show in Unreal accurately, and that is to create a Look Dev Light Rig. A look dev light rig is a level/scene that is set up for neutral lighting to test your model and materials in engine. You can have multiple rigs - a neutral one and any additional rigs for more dramatic lighting. You leave the rig alone while you import your assets to see how they look. These rigs can also be used to display your assets for your portfolio or to show off. 

    (For my capstone, I'd like to create a neutral rig and then some super blue-tinted rigs - to replicate underwater lighting - so that I know what my assets will look like before I go through the process of finalizing an asset for the game.)

    I am more familiar with Light Rigs in animation projects, so there might be another way to do this for games, but they should work about the same way. In the William Faucher video above, Faucher uses HDRIs to create a 1:1 comparison between Painter and Unreal. He takes an HDRI and uses it as the environment in Painter and creates a level in Unreal with ONLY an HDRI backdrop with the same HDRI map.


    For example, here in Painter I am using the "Palermo sidewalk" HDRI as my Environment Map and a neutral gray material on my model.


    In Unreal, I have the same "Palermo Sidewalk" HDRI on my HDRI Backdrop with the same neutral gray material on my model. I also have a Post Process volume in the level. (I have the volume to control my exposure and to turn off any global illumination.)


    With these settings and some minor adjustments to the 'Environment Exposure' setting in Painter, my viewports look almost the same. (The range I've found for the Environment Exposure(EV) setting is between -1 to 1. You should adjust this exposure so that the lighting matches as close as possible to the exposure in the Unreal scene.)


    This is great, because now when I create any material in Painter, I know what it should look like in Unreal Engine. 

    When texturing for your next project, I'd recommend having an HDRI that has a similar look and feel to your game so that the materials you create will look like they belong in the level. My current capstone is very blue, for example, so I need to find a blue-tinted HDRI to use in Substance Painter. There is also the possibility of creating an HDRI out of your level in Unreal Engine which I might have to try.


    Other Things Concerning Color


    Color Grading - more useful in film and animation, but this can be useful for creating a certain look and feel for your games. Some of these videos cover it in Davinci Resolve, but there are similar settings in the post Process Volume in Unreal Engine. Also could be useful if you want to do a cinematic or something.


    Color Grading Tips - There are some tidbits I like in this one.

    Color for Games: A GDC Talk - super cool talk about color grading games!

    Color in Video Games - I really like this video for color design in games specifically. Color is very important for visual storytelling.


    Tuesday, January 31, 2023

    Artist Roadmap!

    Roadmap for Art Career!

    1) Past graduation, what is my overall career goal?

            The first step is finding a position with the opportunity to learn from more experienced lighting artists. I would not like to be in a small team where I am the end all be all of lighting - I want to learn more! I feel like realistic games have more interesting lighting scenarios - so maybe I would try for a larger AAA company.


    2) What type of artist do you want to be?

            I want to be a lighting artist! From my research, I have also seen lighters overlap with level art, so I would like to explore that option too. 


    3) For which companies do you want to work?

            I love Ubisoft games, so working on an Assassin's Creed game is the dream. I'm also a huge fan of the EA Star Wars games. Ghost of Tsushima was also very inspiring! (Sucker Punch!)

    Action Items:

    - clear understanding of color (scripts and color theory)

    - properties of light (science!)

    - understanding of engines replicating light

    - photography

    - assembling environments from asset packs and lighting them


    Artstation: https://www.artstation.com/hmarti

    Puref Board